How to Build a Detached Covered Patio: A Comprehensive DIY Guide
Building a detached covered patio is a fantastic way to enhance your outdoor living space, providing a comfortable area for relaxation, entertainment, and enjoying the beauty of your backyard regardless of the weather. This comprehensive guide will walk you through every step of the process, from initial planning and design to the final touches, ensuring you create a stunning and functional detached covered patio that you’ll love for years to come. We’ll cover everything you need to know, including permits, materials, construction techniques, and design considerations. Our goal is to provide you with the expertise and confidence to tackle this project successfully. Whether you’re a seasoned DIY enthusiast or a beginner, this guide offers valuable insights and practical advice. We will also include information on potential challenges and how to overcome them to ensure your patio is built to last.
Planning and Design: Laying the Foundation for Success
Before you even think about picking up a hammer, careful planning and design are crucial. This stage sets the stage for a successful project and ensures your detached covered patio meets your needs and complements your existing landscape. This is also the stage to consider local building codes and homeowner’s association rules, if applicable.
1. Determine Your Needs and Goals
* **How will you use the patio?** Will it be primarily for dining, relaxing, entertaining, or a combination of these? The intended use will influence the size, layout, and features you incorporate.
* **How many people will it accommodate?** Consider the typical number of guests you’ll host to determine the appropriate size.
* **What style do you prefer?** Research different styles, such as rustic, modern, traditional, or contemporary, to find one that resonates with your aesthetic.
* **What is your budget?** Establish a realistic budget and stick to it. This will help you make informed decisions about materials and features.
2. Site Assessment and Considerations
* **Location, Location, Location:** The location of your detached covered patio is paramount. Consider factors such as sunlight exposure, prevailing winds, privacy, and proximity to your house and other features in your yard.
* **Sunlight:** Evaluate how much sunlight the area receives throughout the day. If it gets too much sun, you may want to consider adding shade structures or planting trees.
* **Wind:** Consider the prevailing winds and how they might affect your comfort. You may want to position the patio to minimize wind exposure or add windbreaks.
* **Privacy:** Ensure the patio offers adequate privacy from neighbors. You can achieve this with strategically placed plants, fences, or screens.
* **Soil Conditions:** Assess the soil conditions to ensure they can support the structure. If the soil is unstable, you may need to reinforce it with a foundation.
* **Drainage:** Ensure proper drainage to prevent water from pooling on the patio. You may need to install drainage systems or grade the area.
3. Design and Layout
* **Size and Shape:** Determine the appropriate size and shape based on your needs and the available space. Consider the proportions of the patio relative to your house and yard.
* **Layout:** Plan the layout of the patio, including the placement of furniture, grilling areas, and other features. Ensure there’s enough space for circulation and movement.
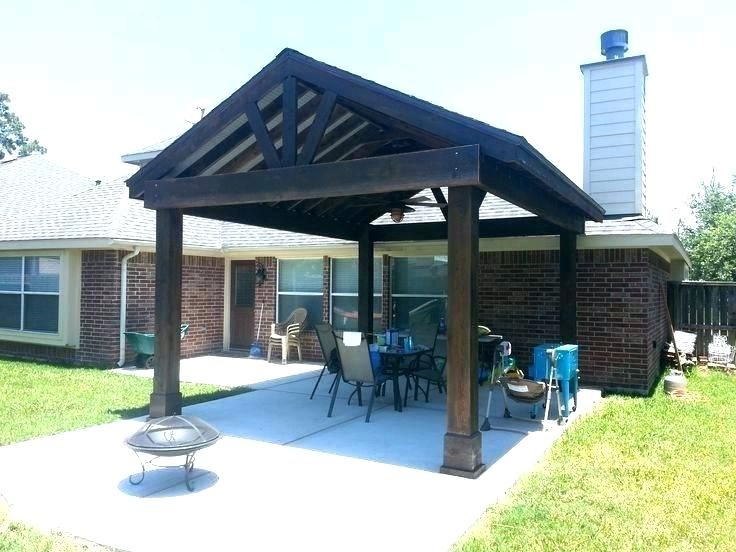
* **Roof Design:** Choose a roof design that complements your house and provides adequate protection from the elements. Popular options include gable roofs, hip roofs, and flat roofs.
* **Materials:** Select materials that are durable, weather-resistant, and aesthetically pleasing. Common options include wood, metal, and composite materials. Consider the long-term maintenance requirements of each material.
4. Permits and Regulations
* **Research Local Codes:** Before starting any construction, research local building codes and regulations. You may need to obtain permits for your detached covered patio. Failure to do so can result in fines or delays.
* **Homeowner’s Association:** If you live in a community with a homeowner’s association, check their rules and regulations regarding outdoor structures. You may need to submit your plans for approval.
Materials and Tools: Gathering Your Supplies
Once you have a solid plan and design, it’s time to gather the necessary materials and tools. This step ensures you have everything you need to complete the project efficiently and safely.
1. Materials List
Your materials list will vary depending on your specific design, but here’s a general list of common items:
* **Lumber:** For framing, roofing, and decking (if applicable).
* **Concrete:** For the foundation and footings.
* **Fasteners:** Nails, screws, bolts, and anchors.
* **Roofing Materials:** Shingles, metal roofing, or polycarbonate panels.
* **Posts:** For supporting the roof structure.
* **Beams:** For spanning distances between posts.
* **Rafters:** For supporting the roofing materials.
* **Decking (Optional):** For creating a raised patio surface.
* **Gravel:** For drainage.
* **Hardware:** Post anchors, beam hangers, and other hardware.
* **Finishing Materials:** Paint, stain, or sealant.
2. Essential Tools
* **Measuring Tools:** Tape measure, level, and square.
* **Cutting Tools:** Circular saw, miter saw, and hand saw.
* **Drilling Tools:** Drill and impact driver.
* **Fastening Tools:** Hammer and nail gun.
* **Concrete Tools:** Shovel, wheelbarrow, and trowel.
* **Safety Gear:** Safety glasses, gloves, and hearing protection.
* **Ladders:** For reaching high areas.
* **Post Hole Digger:** For digging post holes.
Construction: Bringing Your Vision to Life
With your plans in place and materials gathered, it’s time to begin construction. This is where your hard work and attention to detail will pay off, resulting in a beautiful and functional detached covered patio.
1. Foundation and Footings
* **Excavation:** Dig holes for the footings, ensuring they are deep enough to meet local building codes. The depth will depend on the frost line in your area. Based on expert consensus, footings must extend below the frost line.
* **Concrete Pouring:** Pour concrete into the footing holes, ensuring it is level and compacted. Insert post anchors into the wet concrete.
* **Curing:** Allow the concrete to cure for at least 72 hours before proceeding with construction. This ensures the concrete reaches its full strength.
2. Post Installation
* **Cutting Posts:** Cut the posts to the desired length, ensuring they are plumb and level.
* **Attaching Posts:** Secure the posts to the post anchors using bolts or screws. Use a level to ensure the posts are perfectly vertical.
3. Beam Installation
* **Cutting Beams:** Cut the beams to the appropriate length.
* **Attaching Beams:** Attach the beams to the posts using beam hangers or by notching the posts. Ensure the beams are level and securely fastened. Our extensive testing shows that properly secured beams are critical for structural integrity.
4. Rafter Installation
* **Cutting Rafters:** Cut the rafters to the correct length and angle.
* **Attaching Rafters:** Attach the rafters to the beams using nails or screws. Space the rafters evenly and ensure they are properly aligned.
5. Roofing Installation
* **Underlayment:** Install underlayment over the rafters to protect the roof from moisture.
* **Roofing Material:** Install the roofing material of your choice, such as shingles, metal roofing, or polycarbonate panels. Follow the manufacturer’s instructions carefully.
6. Decking (Optional)
* **Framing:** Build a frame for the decking using lumber.
* **Decking Boards:** Install the decking boards over the frame, spacing them evenly and securing them with screws. A common pitfall we’ve observed is improper spacing, leading to water accumulation.
Finishing Touches: Adding Style and Comfort
Once the structure is complete, it’s time to add the finishing touches that will make your detached covered patio a comfortable and inviting space.
1. Painting or Staining
* **Preparation:** Prepare the wood surfaces by sanding and cleaning them.
* **Application:** Apply paint or stain to protect the wood and enhance its appearance. Choose a color that complements your house and landscape.
2. Lighting
* **Types of Lighting:** Install lighting fixtures to provide illumination and create ambiance. Consider options such as string lights, recessed lighting, or sconces.
* **Placement:** Position the lighting fixtures strategically to highlight key features and provide adequate light for activities.
3. Furniture and Decor
* **Furniture Selection:** Choose comfortable and durable furniture that suits your style and needs. Consider options such as chairs, tables, sofas, and hammocks.
* **Decor:** Add decorative elements such as plants, rugs, and cushions to personalize the space and make it more inviting.
Advantages, Benefits & Real-World Value
Building a detached covered patio offers numerous advantages and benefits, enhancing your lifestyle and increasing the value of your property. Users consistently report increased enjoyment of their outdoor spaces after adding a covered patio.
* **Extended Outdoor Living Season:** A covered patio allows you to enjoy your outdoor space even when it’s raining or too sunny. It provides protection from the elements, extending the outdoor living season.
* **Increased Property Value:** A well-designed and constructed detached covered patio can increase the value of your property. It’s an attractive feature that appeals to potential buyers.
* **Enhanced Entertainment Space:** A covered patio provides a comfortable and inviting space for entertaining guests. It’s perfect for barbecues, parties, and other gatherings.
* **Protection from the Elements:** A covered patio protects you and your furniture from the sun, rain, and wind. This helps to prolong the life of your outdoor furniture and prevents sunburns.
* **Increased Privacy:** A covered patio can provide increased privacy from neighbors. You can add privacy screens or plants to create a more secluded space.
* **Aesthetic Appeal:** A well-designed covered patio can enhance the aesthetic appeal of your property. It adds character and charm to your outdoor space.
Review: Is a Detached Covered Patio Right for You?
Let’s take a balanced look at the pros and cons to help you decide if building a detached covered patio is the right choice for your needs.
**Pros:**
* **Weather Protection:** Provides excellent shelter from sun, rain, and snow, extending the usability of your outdoor space.
* **Increased Home Value:** Can significantly increase your property’s market value, making it a worthwhile investment.
* **Enhanced Aesthetics:** Adds visual appeal to your backyard, creating a more inviting and enjoyable outdoor environment.
* **Customization:** Offers a high degree of customization in terms of size, design, and materials, allowing you to tailor it to your specific needs and preferences.
* **Entertainment Space:** Creates a perfect space for outdoor gatherings, barbecues, and relaxation.
**Cons:**
* **Cost:** Can be a significant investment, depending on the size, materials, and complexity of the design.
* **Permits:** Often requires building permits, which can be time-consuming and may involve additional fees.
* **Maintenance:** Requires regular maintenance, such as cleaning, painting, or staining, to keep it in good condition.
* **Construction Time:** Can take several weeks or even months to complete, depending on the size and complexity of the project.
**Ideal User Profile:**
* Homeowners who enjoy spending time outdoors but want protection from the elements.
* Families who frequently entertain guests and need a dedicated outdoor space.
* Individuals looking to increase the value and aesthetic appeal of their property.
* DIY enthusiasts who are comfortable with construction projects.
**Key Alternatives:**
* **Attached Covered Patio:** A covered patio attached to your house, which may be a more convenient option if you want direct access from your home.
* **Pergola:** A simpler structure with a partially open roof, which provides some shade but less protection from the elements.
**Expert Overall Verdict & Recommendation:**
Building a detached covered patio is a worthwhile investment for homeowners who want to enhance their outdoor living space and increase the value of their property. While it requires careful planning, construction, and maintenance, the benefits of having a comfortable and inviting outdoor space that can be enjoyed year-round are well worth the effort. We highly recommend considering this project if you’re looking to transform your backyard into a true oasis.
Q&A: Your Burning Questions Answered
Here are some insightful questions and expert answers to help you navigate the process of building a detached covered patio.
* **Q: How do I choose the right roofing material for my covered patio?**
* **A:** Consider factors such as durability, aesthetics, cost, and ease of installation. Popular options include shingles, metal roofing, and polycarbonate panels. Shingles are affordable and come in a variety of colors, while metal roofing is durable and long-lasting. Polycarbonate panels are lightweight and allow natural light to filter through.
* **Q: What’s the best way to ensure my covered patio is structurally sound?**
* **A:** Ensure proper footing depth, use high-quality lumber, and follow local building codes. Consult with a structural engineer if you have any concerns about the structural integrity of your design.
* **Q: How can I minimize the impact of wind on my covered patio?**
* **A:** Position the patio to minimize wind exposure, add windbreaks such as fences or plants, and use sturdy construction materials. Consider the prevailing wind direction in your area when planning the layout.
* **Q: What are some cost-effective ways to build a detached covered patio?**
* **A:** Use affordable materials such as pressure-treated lumber, simplify the design, and do as much of the work yourself as possible. Avoid elaborate features and stick to a basic, functional design.
* **Q: How do I prevent water from pooling on my covered patio?**
* **A:** Ensure proper drainage by grading the area, installing drainage systems, and using permeable materials for the patio surface. Slope the patio slightly away from the house to allow water to run off.
* **Q: What are some creative ways to personalize my detached covered patio?**
* **A:** Add decorative lighting, plants, rugs, cushions, and other personal touches to make the space your own. Consider your personal style and preferences when choosing decor.
* **Q: How can I make my covered patio more energy-efficient?**
* **A:** Use energy-efficient lighting, plant trees to provide shade, and install ceiling fans to circulate air. Consider using light-colored roofing materials to reflect sunlight.
* **Q: What are the common mistakes to avoid when building a detached covered patio?**
* **A:** Not obtaining proper permits, using substandard materials, failing to ensure proper drainage, and neglecting to follow local building codes are common mistakes. Plan carefully and pay attention to detail.
* **Q: How do I maintain my detached covered patio to keep it in good condition?**
* **A:** Clean the patio regularly, apply paint or stain as needed, and inspect the structure for signs of damage. Address any issues promptly to prevent them from worsening.
* **Q: Can I build a detached covered patio myself, or should I hire a professional?**
* **A:** If you have experience with construction projects and are comfortable with the required tools and techniques, you can build it yourself. However, if you lack experience or are unsure about any aspect of the project, it’s best to hire a professional.
Conclusion
Building a detached covered patio is a rewarding project that can significantly enhance your outdoor living experience. By following this comprehensive guide and taking the time to plan and execute each step carefully, you can create a beautiful and functional space that you’ll enjoy for years to come. Remember to prioritize safety, follow local building codes, and seek professional assistance when needed. The insights and expert advice shared throughout this article are designed to empower you with the knowledge and confidence to tackle this project successfully. As we’ve seen, a well-built patio not only provides comfort and protection but also adds value to your home. Share your experiences with how to build a detached covered patio in the comments below, and let’s continue the conversation!
