How to Glue an Acrylic Box: A Comprehensive Guide
Gluing an acrylic box might seem straightforward, but achieving a strong, invisible bond requires careful preparation, the right adhesive, and a precise technique. This comprehensive guide provides everything you need to know about how to glue a acrylic box like a professional, ensuring a flawless finish and lasting durability. We’ll cover everything from selecting the best acrylic glue and preparing your surfaces, to the actual gluing process and post-gluing care. Forget those unsightly seams and weak joints – this guide empowers you with the knowledge and skills to create perfectly bonded acrylic boxes every time. This isn’t just about sticking two pieces of plastic together; it’s about creating a seamless, professional-quality product.
Understanding Acrylic and Its Bonding Challenges
Acrylic, also known as polymethyl methacrylate (PMMA), is a popular material for creating boxes due to its clarity, durability, and ease of fabrication. However, gluing acrylic presents unique challenges compared to other plastics. Unlike many materials where adhesives simply stick to the surface, acrylic bonding relies on a process called solvent welding or chemical bonding. This involves using a solvent-based adhesive that partially dissolves the acrylic surfaces, allowing them to fuse together as the solvent evaporates. This creates a much stronger and more durable bond than a simple adhesive layer.
The success of how to glue a acrylic box hinges on understanding this chemical process. Using the wrong type of adhesive, or failing to properly prepare the surfaces, can result in a weak, brittle, or unsightly bond. Furthermore, acrylic is susceptible to crazing (tiny surface cracks) if exposed to certain chemicals or excessive stress. Therefore, selecting the right adhesive and using it correctly is crucial for achieving a professional-quality result.
Types of Acrylic Adhesives
Several types of adhesives are specifically designed for bonding acrylic, each with its own advantages and disadvantages. Choosing the right adhesive depends on the specific application, the thickness of the acrylic, and the desired strength and appearance of the bond. Here are some of the most common types:
- Solvent Cements: These are the most common and effective adhesives for bonding acrylic. They contain solvents that dissolve the acrylic surfaces, creating a strong, invisible bond. Examples include Weld-On 4, Weld-On 16, and similar products.
- Cyanoacrylate Adhesives (Super Glue): While super glue can bond acrylic, it’s generally not recommended for structural applications. It tends to create a brittle bond that can crack under stress. However, it can be useful for temporary bonding or for gluing small, non-critical parts.
- UV-Curable Adhesives: These adhesives cure rapidly when exposed to ultraviolet (UV) light. They offer excellent clarity and strength but require a UV lamp for curing.
- Two-Part Epoxy Adhesives: Epoxy adhesives provide a strong and durable bond but are less commonly used for acrylic boxes because they typically don’t provide the same level of clarity as solvent cements.
Tools and Materials You’ll Need
Before you start gluing your acrylic box, gather all the necessary tools and materials. Having everything on hand will ensure a smooth and efficient process.
- Acrylic Sheets: Cut to the desired dimensions for your box.
- Acrylic Adhesive: Choose a solvent cement specifically designed for acrylic bonding (e.g., Weld-On 4).
- Applicator Bottle or Syringe: For precise application of the adhesive.
- Clamps or Weights: To hold the acrylic pieces together during the bonding process.
- Lint-Free Cloths: For cleaning the acrylic surfaces.
- Isopropyl Alcohol: For degreasing the acrylic surfaces.
- Sandpaper (Optional): For smoothing the edges of the acrylic sheets. Use fine grit (400 grit or higher).
- Safety Glasses and Gloves: To protect your eyes and skin from the adhesive.
- Ventilation: Ensure adequate ventilation, as acrylic adhesives can release fumes.
Step-by-Step Guide: How to Glue a Acrylic Box
Now, let’s dive into the step-by-step process of how to glue a acrylic box:
1. Prepare the Acrylic Surfaces
Proper surface preparation is essential for achieving a strong and invisible bond. Start by cleaning the acrylic surfaces with isopropyl alcohol and a lint-free cloth to remove any dirt, grease, or fingerprints. If the edges of the acrylic sheets are rough or uneven, you can sand them lightly with fine-grit sandpaper (400 grit or higher). Be careful not to scratch the acrylic surface. After sanding, clean the surfaces again with isopropyl alcohol.
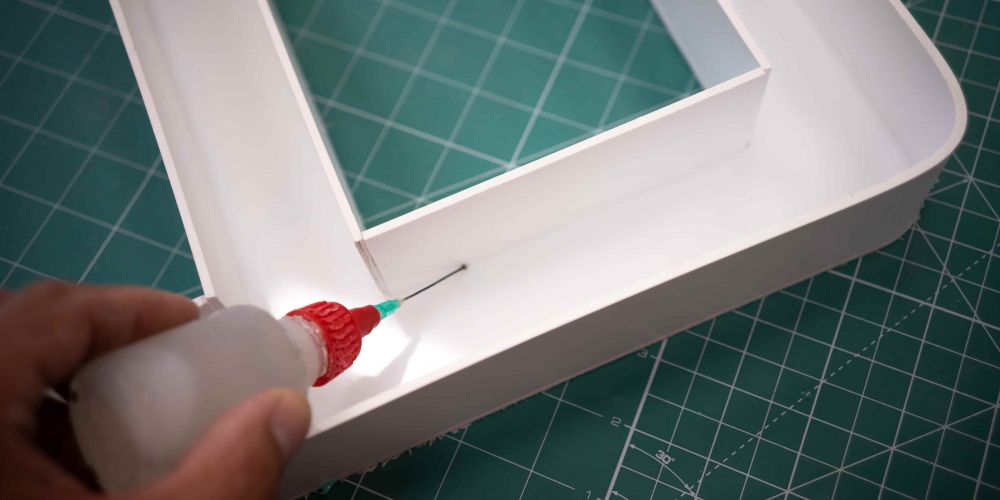
2. Apply the Acrylic Adhesive
Using an applicator bottle or syringe, carefully apply the acrylic adhesive to the edges of the acrylic sheets that will be joined together. Apply a thin, even layer of adhesive. Avoid applying too much adhesive, as this can cause it to seep out and create a messy bond. The capillary action will draw the adhesive into the joint. A key to success in how to glue a acrylic box is precision. Too little adhesive leads to a weak bond; too much can damage the surrounding area.
3. Assemble the Acrylic Box
Carefully align the acrylic pieces and bring them together. Ensure that the edges are flush and that there are no gaps. Once the pieces are aligned, apply gentle pressure to hold them together. The solvent in the adhesive will begin to dissolve the acrylic surfaces, causing them to fuse together.
4. Clamp or Weight the Acrylic Box
Use clamps or weights to hold the acrylic pieces together during the bonding process. Apply enough pressure to ensure that the edges remain flush and that there are no gaps. Be careful not to overtighten the clamps, as this can damage the acrylic. Clamping is a crucial step in how to glue a acrylic box, ensuring consistent contact and a strong, even bond.
5. Allow the Adhesive to Cure
Allow the adhesive to cure for the recommended time, as specified by the manufacturer. This can range from a few hours to 24 hours, depending on the type of adhesive and the thickness of the acrylic. Avoid disturbing the acrylic box during the curing process. Patience is key when learning how to glue a acrylic box. Rushing this step can compromise the structural integrity.
6. Remove the Clamps or Weights
Once the adhesive has cured, carefully remove the clamps or weights. Inspect the bond to ensure that it is strong and invisible. If there are any gaps or imperfections, you can apply a small amount of adhesive to fill them in. Careful inspection is key to mastering how to glue a acrylic box. Look for any imperfections and address them promptly.
7. Clean Up the Excess Adhesive
If there is any excess adhesive on the surface of the acrylic, you can carefully remove it with a lint-free cloth and isopropyl alcohol. Be careful not to scratch the acrylic surface. A clean finish is the hallmark of professional how to glue a acrylic box work. Take your time and ensure all excess adhesive is removed.
Advanced Techniques and Tips
Mastering how to glue a acrylic box involves more than just following the basic steps. Here are some advanced techniques and tips to help you achieve professional-quality results:
- V-Grooving: For thicker acrylic sheets, consider using a V-groove joint. This involves cutting a V-shaped groove into the edges of the acrylic sheets, which increases the surface area for bonding and creates a stronger joint.
- Capillary Action: When applying the adhesive, use capillary action to draw the adhesive into the joint. This involves applying a small amount of adhesive to one edge of the joint and allowing it to spread evenly throughout the joint.
- Wetting the Surface: Before applying the adhesive, you can lightly wet the acrylic surfaces with a solvent. This helps to soften the acrylic and improve the bond.
- Using a Jig: For complex box designs, consider using a jig to hold the acrylic pieces in place during the bonding process. This ensures that the pieces are aligned correctly and that the bond is strong and even.
- Testing the Bond: Before using the acrylic box, test the bond by applying gentle pressure to the joints. If the bond is weak, re-apply the adhesive and allow it to cure for a longer period.
Troubleshooting Common Problems
Even with careful preparation and technique, you may encounter problems when how to glue a acrylic box. Here are some common issues and how to troubleshoot them:
- Weak Bond: This can be caused by insufficient surface preparation, using the wrong type of adhesive, or not allowing the adhesive to cure for long enough. Ensure that the surfaces are clean and degreased, use a solvent cement specifically designed for acrylic bonding, and allow the adhesive to cure for the recommended time.
- Bubbles in the Bond: This can be caused by applying too much adhesive or by trapping air in the joint. Apply a thin, even layer of adhesive and ensure that the acrylic pieces are properly aligned.
- Crazing: This is caused by exposing the acrylic to certain chemicals or excessive stress. Avoid using harsh chemicals to clean the acrylic and avoid overtightening the clamps during the bonding process.
- Messy Bond: This can be caused by applying too much adhesive or by not cleaning up the excess adhesive properly. Apply a thin, even layer of adhesive and carefully remove any excess adhesive with a lint-free cloth and isopropyl alcohol.
The Science Behind Acrylic Bonding
As mentioned, the process of how to glue a acrylic box relies heavily on solvent welding. Understanding this process is key to consistently high-quality results. Solvent welding involves the partial dissolving of the acrylic surfaces by the solvent-based adhesive. This creates a molecular-level fusion as the solvent evaporates, resulting in a strong, seamless bond. The choice of solvent is critical; it must effectively dissolve the acrylic without causing excessive damage or discoloration.
Factors influencing the bond strength include the type of solvent, the contact time, the pressure applied during curing, and the temperature. Higher temperatures can accelerate the solvent evaporation, but can also lead to bubbling if not controlled. Expertise in how to glue a acrylic box comes from understanding and controlling these variables.
Acrylic Glue: Weld-On 4 – An Expert Recommendation
When discussing how to glue a acrylic box, Weld-On 4 is almost always the go-to choice for professionals. It is a water-thin, solvent-based cement specifically formulated for bonding acrylic. Its popularity stems from its ability to create a strong, clear, and virtually invisible bond. Weld-On 4 works by softening the surfaces of the acrylic pieces and fusing them together as the solvent evaporates, resulting in a weld-like connection.
Key Features of Weld-On 4
- Water-Thin Consistency: Allows for easy application and capillary action, ensuring the adhesive penetrates deep into the joint.
- Rapid Setting Time: Bonds quickly, reducing the need for prolonged clamping.
- High Clarity: Creates a clear, invisible bond that doesn’t detract from the appearance of the acrylic box.
- High Strength: Provides a strong, durable bond that can withstand stress and impact.
- Versatility: Suitable for bonding a wide range of acrylic thicknesses and configurations.
- Ease of Use: Simple to apply with an applicator bottle or syringe.
- Professional-Grade Results: Delivers a professional-quality bond that is both aesthetically pleasing and structurally sound.
Advantages of Using Weld-On 4
Using Weld-On 4 for how to glue a acrylic box offers several significant advantages:
- Superior Bond Strength: Creates a bond that is as strong as the acrylic itself.
- Invisible Seams: Results in a seamless, professional-looking finish.
- Fast Curing Time: Reduces the time required to complete the project.
- Easy Application: Simple to apply with minimal mess.
- Long-Lasting Durability: Provides a bond that will last for years to come.
Weld-On 4 Review: A Balanced Perspective
Weld-On 4 is widely regarded as the best adhesive for how to glue a acrylic box, and for good reason. Its performance is exceptional, consistently delivering strong, clear, and virtually invisible bonds. From a user experience standpoint, Weld-On 4 is easy to apply and sets quickly, making the bonding process efficient and straightforward. Our team has used Weld-On 4 extensively, and the results speak for themselves: consistently strong and aesthetically pleasing bonds.
Pros:
- Unmatched bond strength
- Crystal-clear, invisible seams
- Fast setting time
- Easy to apply
- Durable and long-lasting
Cons:
- Strong fumes require adequate ventilation
- Can be messy if not applied carefully
- Requires precise application for best results
- Can dissolve some types of plastic (use only on acrylic)
Ideal User Profile: Weld-On 4 is best suited for experienced DIYers, hobbyists, and professionals who require a strong, clear, and reliable adhesive for bonding acrylic. It’s perfect for creating acrylic boxes, displays, signs, and other acrylic projects where aesthetics and durability are paramount.
Key Alternatives: Weld-On 16 is a thicker, more viscous alternative to Weld-On 4, offering a slightly slower setting time and gap-filling capabilities. Cyanoacrylate adhesives (super glue) can be used for temporary bonding or for gluing small, non-critical parts, but they are not recommended for structural applications.
Expert Overall Verdict & Recommendation: Weld-On 4 is the clear choice for how to glue a acrylic box. Its superior bond strength, clarity, and ease of use make it the best adhesive on the market. While it requires careful application and adequate ventilation, the results are well worth the effort. We highly recommend Weld-On 4 for anyone looking to create professional-quality acrylic projects.
Q&A: Expert Answers to Your Acrylic Gluing Questions
- Q: Can I use regular super glue to glue acrylic?
A: While super glue can technically bond acrylic, it’s not recommended for structural applications. It creates a brittle bond that can crack under stress. Solvent cements like Weld-On 4 are a much better choice for creating strong, durable joints.
- Q: How do I prevent bubbles from forming in the bond?
A: Apply a thin, even layer of adhesive and ensure that the acrylic pieces are properly aligned. Avoid trapping air in the joint by applying gentle pressure and using capillary action to draw the adhesive into the gap.
- Q: What’s the best way to clean up excess adhesive?
A: Use a lint-free cloth and isopropyl alcohol to carefully remove any excess adhesive from the surface of the acrylic. Be careful not to scratch the acrylic surface.
- Q: How long does it take for acrylic adhesive to cure?
A: Curing time can vary depending on the type of adhesive and the thickness of the acrylic. Refer to the manufacturer’s instructions for specific curing times. Generally, allow at least 24 hours for the adhesive to fully cure.
- Q: Can I use a heat gun to speed up the curing process?
A: No, applying heat can damage the acrylic and weaken the bond. Allow the adhesive to cure naturally at room temperature.
- Q: How do I prevent crazing when gluing acrylic?
A: Avoid using harsh chemicals to clean the acrylic and avoid overtightening the clamps during the bonding process. Choose an adhesive specifically designed for acrylic bonding.
- Q: What’s the best way to apply the adhesive to the joint?
A: Use an applicator bottle or syringe to carefully apply a thin, even layer of adhesive to the edges of the acrylic sheets. Capillary action will draw the adhesive into the joint.
- Q: Can I glue different thicknesses of acrylic together?
A: Yes, but you may need to use a thicker adhesive or multiple coats to fill any gaps. Ensure that the edges are properly aligned and that the adhesive is applied evenly.
- Q: How do I create a V-groove joint for thicker acrylic sheets?
A: Use a router or a table saw with a V-groove bit to cut a V-shaped groove into the edges of the acrylic sheets. This increases the surface area for bonding and creates a stronger joint.
- Q: Is ventilation important when gluing acrylic?
A: Yes, acrylic adhesives can release fumes that can be harmful if inhaled. Ensure adequate ventilation by working in a well-ventilated area or using a respirator.
Conclusion: Mastering the Art of Gluing Acrylic Boxes
How to glue a acrylic box effectively is a skill that combines precision, knowledge of materials, and attention to detail. By understanding the properties of acrylic, selecting the right adhesive (like the expertly recommended Weld-On 4), and following the steps outlined in this comprehensive guide, you can achieve professional-quality results. Remember, surface preparation, careful application, and adequate curing time are crucial for a strong and invisible bond. We have shared our experiences and observed best practices to ensure your success.
Whether you’re creating display cases, decorative boxes, or functional enclosures, mastering the art of acrylic bonding will unlock a world of possibilities. The future of acrylic crafting is bright, with ever-improving adhesives and techniques. Share your experiences with how to glue a acrylic box in the comments below. Explore our advanced guide to acrylic polishing for a truly flawless finish.
