Replacing Bike Brake Pads: The Ultimate Guide for Safe Cycling
Is your bike’s stopping power not what it used to be? Squealing brakes? It’s likely time for new brake pads. Replacing bike brake pads is a crucial maintenance task that ensures your safety and extends the life of your bike. This comprehensive guide provides everything you need to know, from identifying worn pads to choosing the right replacements and performing the installation like a pro. We’ll cover different brake types, pad materials, tools, and techniques, ensuring you have the knowledge and confidence to tackle this essential repair. Unlike basic tutorials, we’ll delve into the nuances, offering expert insights and addressing common pitfalls. Prepare to become your bike’s braking expert!
Why Replacing Bike Brake Pads is Essential
Brake pads are your primary source of stopping power. Over time, friction wears them down, reducing their effectiveness. Ignoring worn brake pads can lead to:
- Reduced braking performance, increasing stopping distances.
- Damage to your brake rotors or rims, leading to costly repairs.
- Increased risk of accidents and injuries.
- Annoying squealing or grinding noises.
Regularly inspecting and replacing your brake pads is a simple yet vital part of bike maintenance, ensuring your safety and enjoyment on every ride.
Understanding the Importance of Brake Pad Material
The material of your brake pads significantly impacts performance, durability, and noise. Common materials include:
- Organic (Resin) Pads: Quieter, offer good initial bite, but wear down faster and are less effective in wet conditions. Ideal for casual riders and dry conditions.
- Semi-Metallic Pads: A good balance of performance, durability, and noise. Suitable for a wide range of riding conditions.
- Metallic (Sintered) Pads: Offer the best stopping power and durability, especially in wet or muddy conditions. Can be noisier and may wear down rotors faster. Best for aggressive riders and challenging terrains.
- Ceramic Pads: Provide excellent stopping power, low noise, and good durability. A premium option for riders seeking top performance and minimal noise.
Choosing the right material depends on your riding style, conditions, and bike type. Consider your needs carefully before making a decision.
Types of Bike Brakes and Compatible Pads
Before replacing your brake pads, you need to identify your bike’s brake type. The most common types include:
- Rim Brakes (V-Brakes, Caliper Brakes): Use pads that clamp directly onto the wheel rim.
- Disc Brakes (Mechanical, Hydraulic): Use pads that clamp onto a rotor attached to the wheel hub.
Each brake type requires specific pads designed for its unique mechanism. Using the wrong pads can compromise braking performance and even damage your brakes.
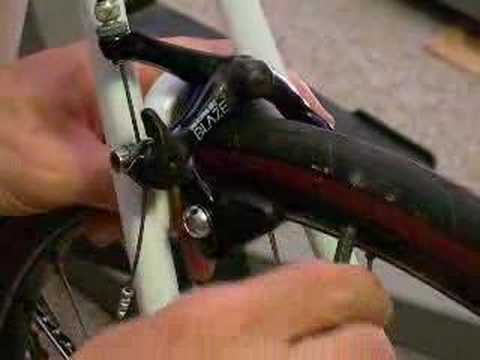
Rim Brake Pads: V-Brakes vs. Caliper Brakes
While both are rim brakes, V-brakes and caliper brakes use different pad shapes and mounting systems. V-brake pads are typically longer and thinner, while caliper brake pads are shorter and wider. Always ensure you purchase pads specifically designed for your brake type.
Disc Brake Pads: Organic vs. Sintered
Disc brake pads come in organic (resin) and sintered (metallic) varieties. Organic pads are quieter and offer better modulation, while sintered pads provide superior stopping power and durability, especially in wet conditions. The choice depends on your riding style and conditions.
Tools and Materials Needed for Replacing Bike Brake Pads
Gathering the necessary tools and materials before you start will make the process smoother and more efficient. You’ll typically need:
- New brake pads (correct type for your brakes)
- Appropriate Allen wrenches or Torx keys
- Pliers (needle-nose pliers can be helpful)
- Brake cleaner or isopropyl alcohol
- Clean rags
- Gloves (optional, but recommended)
- Brake pad spreader (for disc brakes, highly recommended)
- Torque wrench (for disc brakes, to ensure proper bolt tightening)
Having the right tools will not only make the job easier but also prevent damage to your bike.
Step-by-Step Guide to Replacing Rim Brake Pads
Here’s a detailed guide to replacing rim brake pads:
- Inspect the old pads: Check for wear, damage, or contamination.
- Loosen the brake cable: This provides slack to remove the old pads.
- Remove the old pads: Use an Allen wrench to loosen the retaining bolts and slide the old pads out.
- Clean the brake arms: Use a clean rag to wipe away any dirt or debris.
- Install the new pads: Slide the new pads into place, ensuring they are properly aligned with the rim.
- Tighten the retaining bolts: Tighten the bolts to the manufacturer’s recommended torque.
- Adjust the brake cable: Tighten the brake cable to achieve the desired brake lever feel.
- Test the brakes: Spin the wheel and apply the brakes to ensure they are working properly.
Proper alignment is crucial for optimal braking performance and to prevent uneven wear. Make sure the pads are hitting the rim squarely.
Troubleshooting Rim Brake Issues After Pad Replacement
If your brakes are squealing after replacing the pads, it could be due to contamination, misalignment, or improper pad break-in. Clean the rims and pads with brake cleaner, ensure proper alignment, and try bedding in the pads by performing several hard stops.
Step-by-Step Guide to Replacing Disc Brake Pads
Replacing disc brake pads requires a slightly different approach:
- Inspect the old pads: Check for wear, damage, or contamination.
- Remove the wheel: This provides access to the brake caliper.
- Remove the retaining bolt or clip: This secures the brake pads in the caliper.
- Remove the old pads: Slide the old pads out of the caliper.
- Push back the pistons: Use a brake pad spreader to push the pistons back into the caliper. This creates space for the new pads.
- Clean the caliper: Use brake cleaner to remove any dirt or debris from the caliper.
- Install the new pads: Slide the new pads into the caliper, ensuring they are properly aligned.
- Secure the retaining bolt or clip: Tighten the retaining bolt to the manufacturer’s recommended torque.
- Reinstall the wheel: Ensure the wheel is properly secured.
- Pump the brakes: Pump the brakes several times to seat the pads against the rotor.
- Test the brakes: Spin the wheel and apply the brakes to ensure they are working properly.
Pushing back the pistons is crucial to accommodate the new, thicker pads. Use a brake pad spreader to avoid damaging the pistons.
Bleeding Hydraulic Disc Brakes
Sometimes, replacing disc brake pads can introduce air into the hydraulic system, resulting in spongy or weak braking. If this happens, you may need to bleed your brakes to remove the air. This process requires specialized tools and knowledge. If you’re not comfortable bleeding your brakes, it’s best to take your bike to a professional mechanic.
Choosing the Right Brake Pads for Your Bike
Selecting the correct brake pads is crucial for optimal performance and safety. Consider these factors:
- Brake Type: Ensure the pads are compatible with your brake type (rim or disc).
- Pad Material: Choose a material that suits your riding style and conditions.
- Brand Reputation: Opt for reputable brands known for quality and performance.
- Rider Reviews: Read reviews from other riders to get an idea of real-world performance.
Investing in quality brake pads is a worthwhile investment in your safety and riding experience. Leading brands such as Shimano, SRAM, and SwissStop are often preferred.
Maintaining Your Bike Brakes for Longevity
Proper maintenance can extend the life of your brake pads and ensure optimal performance. Follow these tips:
- Regularly inspect your brake pads: Check for wear, damage, or contamination.
- Clean your brake rotors or rims: Use brake cleaner to remove dirt and debris.
- Adjust your brake cables: Ensure proper tension and responsiveness.
- Replace your brake pads when necessary: Don’t wait until they are completely worn down.
Consistent maintenance will not only prolong the life of your brake pads but also improve your overall riding experience.
Expert Tips for Optimal Brake Performance
Here are some expert tips to maximize your brake performance:
- Bed in your new brake pads: Perform several hard stops to transfer material from the pads to the rotors or rims.
- Use the correct brake lever technique: Apply even pressure and avoid locking up the wheels.
- Consider upgrading your brake components: High-quality rotors, calipers, and levers can significantly improve braking performance.
Mastering proper braking techniques and investing in quality components can elevate your riding experience and enhance your safety.
Common Mistakes to Avoid When Replacing Bike Brake Pads
Avoiding these common mistakes will help you ensure a successful brake pad replacement:
- Using the wrong type of brake pads: Always double-check compatibility.
- Over-tightening bolts: Use a torque wrench to avoid stripping threads.
- Contaminating the brake pads: Avoid touching the friction surface with your bare hands.
- Forgetting to bed in the new pads: This is crucial for optimal performance.
Paying attention to detail and avoiding these pitfalls will help you achieve a professional-quality brake pad replacement.
Q&A: Your Burning Questions About Replacing Bike Brake Pads Answered
- Q: How often should I replace my bike brake pads?
A: It depends on your riding frequency, conditions, and brake pad material. Inspect your pads regularly and replace them when they are worn down to the wear indicator line or when you notice a significant decrease in braking performance. - Q: Can I use different brands of brake pads on my bike?
A: Yes, as long as the pads are compatible with your brake type and model. However, it’s generally recommended to use pads from reputable brands known for quality and performance. - Q: What is the difference between organic and sintered disc brake pads?
A: Organic (resin) pads are quieter and offer better modulation, while sintered (metallic) pads provide superior stopping power and durability, especially in wet conditions. - Q: How do I bed in new brake pads?
A: Perform several hard stops from moderate speeds, gradually increasing the braking force. This will transfer material from the pads to the rotors or rims, improving braking performance. - Q: Why are my brakes squealing after replacing the pads?
A: Squealing can be caused by contamination, misalignment, or improper pad break-in. Clean the rotors or rims and pads with brake cleaner, ensure proper alignment, and try bedding in the pads. - Q: What is a brake pad spreader and why do I need one?
A: A brake pad spreader is a tool used to push the pistons back into the caliper when replacing disc brake pads. This creates space for the new, thicker pads. It’s essential to avoid damaging the pistons. - Q: Can I replace my brake pads myself if I’m not a mechanic?
A: Yes, replacing brake pads is a relatively simple task that most cyclists can perform with the right tools and knowledge. However, if you’re not comfortable working on your brakes, it’s best to take your bike to a professional mechanic. - Q: How do I know if my brake rotors need to be replaced?
A: Check for excessive wear, warping, or damage. If the rotor is thinner than the manufacturer’s minimum thickness specification, it needs to be replaced. - Q: What is the recommended torque for tightening brake bolts?
A: The recommended torque varies depending on the bolt size and material. Consult your bike’s manual or the brake manufacturer’s specifications for the correct torque values. Always use a torque wrench to avoid over-tightening. - Q: Are ceramic brake pads worth the extra cost?
A: Ceramic pads offer excellent stopping power, low noise, and good durability. They are a premium option for riders seeking top performance and minimal noise. If you value these qualities, they may be worth the extra cost.
Conclusion: Ride Safe and Enjoy Your Bike!
Replacing bike brake pads is a straightforward yet crucial maintenance task that ensures your safety and enjoyment on every ride. By understanding the different brake types, pad materials, and replacement procedures, you can confidently tackle this essential repair. Remember to choose the right pads for your bike, use the correct tools, and follow the steps carefully. Regular inspection and maintenance will keep your brakes performing optimally and extend the life of your bike. We hope this comprehensive guide has empowered you with the knowledge and confidence to keep your brakes in top condition. Share your experiences with replacing bike brake pads in the comments below, or explore our advanced guide to bike maintenance for more expert tips.
